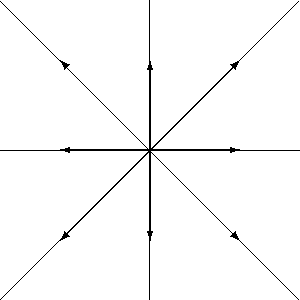
rootso5.fig. Remember to
select the
![]() has a built-in environment for describing pictures to be
included into documents. Unfortunately, the mechanics of
entering such a picture are quite clumsy, involving a lot of
coördinates and slopes, but fig provides a way of
automatically creating such a file. Suppose you want to
include a diagram (say the root system of SO(5)) in a
document. Use fig to create the appropriate diagram and
save the result in a file called, say,
has a built-in environment for describing pictures to be
included into documents. Unfortunately, the mechanics of
entering such a picture are quite clumsy, involving a lot of
coördinates and slopes, but fig provides a way of
automatically creating such a file. Suppose you want to
include a diagram (say the root system of SO(5)) in a
document. Use fig to create the appropriate diagram and
save the result in a file called, say, rootso5.fig. Remember to
select the ![]() option on the fig screen so that fig will not
permit you to draw lines that
option on the fig screen so that fig will not
permit you to draw lines that ![]() cannot produce.
cannot produce.
You will need to choose the right file format from the Export menu.
to
create a file called rootso5.tex with the appropriate
diagram encoded in a form that ![]() will understand. Note that this file
cannot be reloaded into xfig, so save an xfig version too. When you get to
the appropriate point in your document, include the following sequence of
commands:
will understand. Note that this file
cannot be reloaded into xfig, so save an xfig version too. When you get to
the appropriate point in your document, include the following sequence of
commands:
\begin{figure}
\begin{center}
\end{center}
\caption{The Root System of $SO(5)$}
\end{figure}

Figure 1: The Root System of SO(5)
This will produce a figure, suitably centered and labeled,
at a ``reasonable'' place in your document. (See the
![]() User's Guide
for details on what is considered to be
``reasonable''.) Although this procedure is evidently quite
straightforward, there are some problems with it. The
easiest problem to rectify is that the xfig program is
rather stubborn about printing only in ordinary Roman font.
If you would like something more interesting (say to label
the roots with appropriate
User's Guide
for details on what is considered to be
``reasonable''.) Although this procedure is evidently quite
straightforward, there are some problems with it. The
easiest problem to rectify is that the xfig program is
rather stubborn about printing only in ordinary Roman font.
If you would like something more interesting (say to label
the roots with appropriate ![]() 's and
's and ![]() 's) then
the easiest thing to do is to put appropriate labels in
Roman font in the original picture using xfig. After you
run fig2dev , you can edit the
's) then
the easiest thing to do is to put appropriate labels in
Roman font in the original picture using xfig. After you
run fig2dev , you can edit the ![]() document and substitute
Greek letters for the Latin equivalents.
document and substitute
Greek letters for the Latin equivalents.
The more difficult problem is that ![]() itself is not
equipped to handle very complicated pictures. It will print
circles only of particular radii and lines and vectors of
particular slopes. To do anything more complex, such as
curved lines, you will need to export from xfig to either
itself is not
equipped to handle very complicated pictures. It will print
circles only of particular radii and lines and vectors of
particular slopes. To do anything more complex, such as
curved lines, you will need to export from xfig to either
eepic or PostScript.